> 2021年02月08日信息消化 ### 网络数字身份认证术 [origin:网络数字身份认证术 | 酷 壳 - CoolShell](https://www.notion.so/clarity-y/CoolShell-5db3cfb85ebb447fbe48c5ac64579792) > MEMO > > 非对称加密, 用一对key(crt公钥,key私钥)实现authentication. > > CA证书也是一对key用来给公钥签名. 文章中用openssl来分别生成key, 查了下openssl与openssh(ssh-gen)区别: *OpenSSH is a program depending on OpenSSL the library, specifically OpenSSH uses the `libcrypto` part of OpenSSL.* cf. [How is OpenSSL related to OpenSSH?](https://security.stackexchange.com/questions/3424/how-is-openssl-related-to-openssh) #### 密钥对和证书 用户密码这个事只能存在于权威机构和普通用户之间,不能存在于普遍应用中。 使用 ECC([Elliptic-Curve Cryptography](https://en.wikipedia.org/wiki/Elliptic-curve_cryptography))椭圆曲线密码术,可以通过一个“密钥对”进行非对称加密。这种技术,在对信息进行加密和解密时,使用两个不同的密钥,其中一个用来做加密,另一个做解密。这样一来,我们就可以把其中一个密钥公布出去,称之为公钥,另一个密钥私密地保管好,称之为私钥。 比如,我用我的私钥加密信息,然后,我把这个私钥所配对的公钥发布给所有人,大家都用公钥解密信息,不用我的公钥你解密不了这个信息。这样一来,就可以保证这个信息是我发出来的,不但保证了信息安全,还完成了身份认证。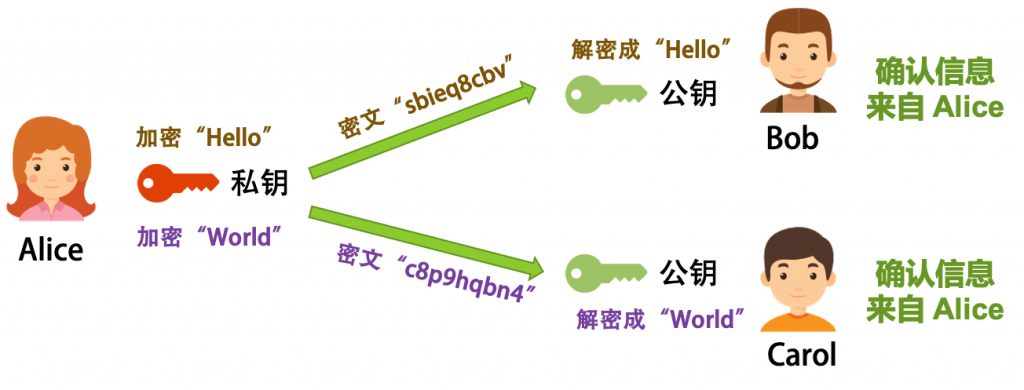 但是,这里还是会有一个很严重的问题,那就是中间人攻击。 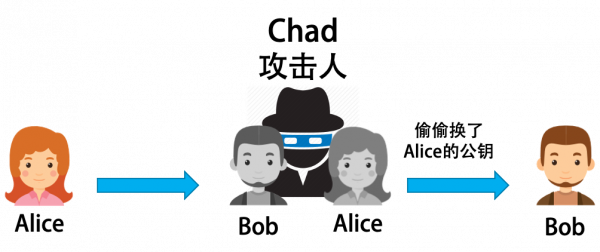 中间人 Chad 把自己伪装成 Bob 向 Alice 要信息,然后,再伪装成 Alice 对 Bob 说,这就是 Alice 的公钥,于是 Bob 也无法验证是不是 Alice 的公钥,因为公钥里就是一堆乱七八糟的数据,我们完全不能分辨哪个公钥属于 Alice 的。试想,如果我们收到声称属于银行的密钥。我们怎么知道它确实属于你的银行? 这里的答案就是**使用数字证书**。证书跟我们的身份证非常类似,其需要一个可信机构来颁发和验证的。这个证书机构 CA(Certificate Authority)是一个是大家都相信的权威机构,他用他的人品保证(当然一般会被严格管理和审计),CA 机构同样使用这样的非对称加密的技术来完成颁发和验证的事。下图展示了这一过程。 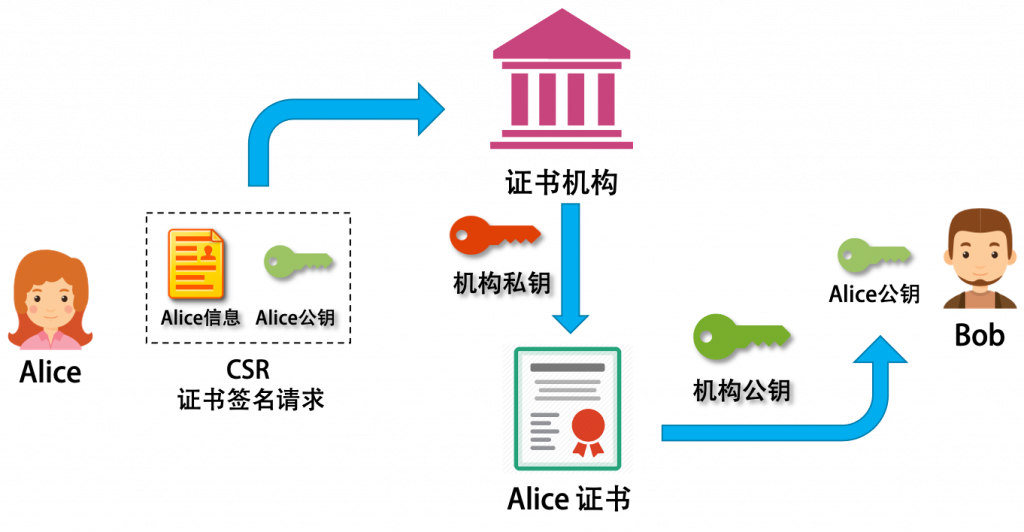 说明一下上面这个图: 1. 为了解决公钥认证的问题的,我们需要一个权威的CA 机构。 2. Alice 把自己的信息(姓名、组织,地址,电邮,网址等)和自己的公钥打包成一个 CSR 的文件,发给 CA 机构, 3. CA 机构会来找 Alice 做物理世界的认证,如果通过后,就会用自己的机构私钥,把CSR 变成一个签名证书。 4. Bob 同学拿到 Alice 的证书,用 CA 机构的公钥解密后,得到 Alice 的公钥 5. 后面就可以签证 信息是否来自 Alice 了。 是的,这个过程就是在“套娃”,这种证书机构还可以给下级的证书机构发证,于是就会一层套一层地,形成一个证书链,顶层的叫根证书,你得绝对信任之。对于验证证书真实性的客户端,它需要能够验证链中所有 CA 的签名,这意味着客户端需要访问链中所有 CA 的证书。 #### 证书生成过程演示 并不是所有的场景都需要向这些大型的 CA 机构申请公钥证书,在任何一个企业,组织或是团体内都可以自己形这样的“小王国”,也就是说,你可以自行生成这样的证书,只需要你自己保证自己的生成证书的私钥的安全,以及不需要扩散到整个互联网。下面,我们用 `openssl`命令来演示这个过程。 1. 生成 CA 的证书(公钥) `ca.crt` 和私钥 `ca.key` ```bash openssl req -newkey rsa:2048 \ -new -nodes -x509 \ -days 365 \ -out ca.crt \ -keyout ca.key \ -subj "/C=SO/ST=Earth/L=Mountain/O=CoolShell/OU=HQ/CN=localhost" ``` 2) 生成 alice 的私钥 ```bash openssl genrsa -out alice.key 2048 ``` 3. 生成 Alice 的 CSR – Certificate Signing Request ```bash openssl req -new -key alice.key 365 -out alice.csr \ -subj "/C=CN/ST=Beijing/L=Haidian/O=CoolShell/OU=Test/CN=localhost.alice" ``` 4. 使用 CA 给 Alice 签名证书 ```bash openssl x509 -req -in alice.csr \ -extfile <(printf "subjectAltName=DNS:localhost.alice") \ -CA ca.crt -CAkey ca.key \ -days 365 -sha256 -CAcreateserial \ -out alice.crt ``` #### 双向认证 mTLS 上面,我们说的基本上都是单向认证,大量的场景都是确保用户方访问的是真正的服务方,如:银行,电商网站,等。这样可以保证用户不会被钓鱼网站或是中间人攻击。但是,很多时候,我们也是需要双向认证的。 如今,**mTLS是**确保云原生应用程序中服务之间的通信安全的首选协议。 也就是双向认证。 传统的 TLS 认证过程是: 1. 客户端连接到服务器 2. 服务器提供其 TLS 证书 3. 客户端验证服务器的证书 4. 客户端和服务器通过加密的 TLS 连接交换信息 在 mTLS 中,客户端和服务器都有一个证书,双方都使用他们的公钥/私钥对进行身份验证。与常规 TLS 相比,mTLS 中有额外的步骤来验证双方(以**粗体显示的**额外步骤): 1. 客户端连接到服务器 2. 服务器提供其 TLS 证书 3. 客户端验证服务器的证书 4. **客户端出示其 TLS 证书** 5. **服务器验证客户端的证书** 6. **服务器授予访问权限** 7. 客户端和服务器通过加密的 TLS 连接交换信息 mTLS 需要“根”TLS 证书;这我们自己来完成证书颁发机构的职责。授权客户端和服务器使用的证书必须与此根证书相对应。根证书是自签名的,这意味着我们需要自己创建它。(注:此方法不适用于公共 Internet 上的单向 TLS,因为外部证书颁发机构必须颁发这些证书) ### Markdown Parser [Creating Your Own Markdown Parser](https://betterprogramming.pub/create-your-own-markdown-parser-bffb392a06db) #### **Basic File Structure** You can easily set up a basic project following this [documentation](https://docs.microsoft.com/en-us/visualstudio/javascript/quickstart-vuejs-with-nodejs?view=vs-2019) ! ```pure markdown ├── src | └── assets | └── style.css | └── components | | └── HelloWorld.vue | └── directives | | └── markdown.js | └── App.vue | └── main.js ├── node_modules ├── public ├── .gitignore ├── package.json ├── package-lock.json ├── babel.config.js └── README.md ``` ```pure |-------------------------------------|---------------------------| | Markdown |HTML | |-------------------------------------|---------------------------| |# Heading level 1 |<h1>Heading level 1</h1> | |## Heading level 2 |<h2>Heading level 2</h2> | |### Heading level 3 |<h3>Heading level 3</h3> | |#### Heading level 4 |<h4>Heading level 4</h4> | |##### Heading level 5 |<h5>Heading level 5</h5> | |###### Heading level 6 |<h6>Heading level 6</h6> | |__bold text__ |<strong>bold text</strong> | |**bold text** |<strong>bold text</strong> | |_italic text_ |<em>italic text</em> | |*italic text* |<em>italic text</em> | |`word` |<code>word</code> | |Unorderered list with "+", "*" | | | + First item | • First item | | + Second item | • Second item | |Link [Guide](https://www.google.com) | Guide | |-----------------------------------------------------------------| ``` It's time to make the directives! I highly recommend the use of [regex101](https://regex101.com/) to test your regex expressions with test strings. You can read about regex over [*here*](https://www.geeksforgeeks.org/write-regular-expressions/). At last, we need to apply the rules we just made with regex to the template passed. The rules parse the template and `innerHTML` sets the HTML contents of an element on a web page. ```js const rules = [ //header rules [/#{6}\s?([^\n]+)/g, "<h6>$1</h6>"], [/#{5}\s?([^\n]+)/g, "<h5>$1</h5>"], [/#{4}\s?([^\n]+)/g, "<h4>$1</h4>"], [/#{3}\s?([^\n]+)/g, "<h3>$1</h3>"], [/#{2}\s?([^\n]+)/g, "<h2>$1</h2>"], [/#{1}\s?([^\n]+)/g, "<h1>$1</h1>"], //bold, italics and paragragh rules [/\*\*\s?([^\n]+)\*\*/g, "<b>$1</b>"], [/\*\s?([^\n]+)\*/g, "<i>$1</i>"], [/__([^_]+)__/g, "<b>$1</b>"], [/_([^_`]+)_/g, "<i>$1</i>"], [/([^\n]+\n?)/g, "<p>$1</p>"], //links [ /\[([^\]]+)\]\(([^)]+)\)/g, '<a href="$2" style="color:#2A5DB0;text-decoration: none;">$1</a>', ], //highlights [ /(`)(\s?[^\n,]+\s?)(`)/g, '<a style="background-color:grey;color:black;text-decoration: none;border-radius: 3px;padding:0 2px;">$2</a>', ], //Lists [/([^\n]+)(\+)([^\n]+)/g, "<ul><li>$3</li></ul>"], [/([^\n]+)(\*)([^\n]+)/g, "<ul><li>$3</li></ul>"], //Image [ /!\[([^\]]+)\]\(([^)]+)\s"([^")]+)"\)/g, '<img src="$2" alt="$1" title="$3" />', ], ]; export default { bind(el){ let html = el.textContent; rules.forEach(([rule, template]) => { html= html.replace(rule, template) }) html = html.replace( ); el.innerHTML = html; } } ``` ### Misc - [Myth #5: “You are a foreigner, therefore you will always have a foreign accent” | Antimoon](https://www.antimoon.com/other/myths-foraccent.htm) - [2021 browser market share](https://engineering.linecorp.com/en/blog/the-baseline-for-web-development-in-2022/?utm_source=tldrnewsletter) -  -  - The HTTP **`204 No Content`** success status response code indicates that a request has succeeded, but that the client doesn't need to navigate away from its current page. [Things you don't need JavaScript for](https://lexoral.com/blog/you-dont-need-js/)